Let’s discuss your container requirements
01708 225350
Call Us
sale@modularmarbles.com
Email Us

How to Choose Sesame Grey Granite for Your Project

Choosing Sesame Grey Granite is not just a color decision. It is a material decision that affects durability, maintenance, and the finished look of a space. Its grey background and scattered mineral flecks can read quietly in one slab and more boldly in another. View full slabs in person whenever possible. Small samples rarely show the complete pattern.

For this introduction, stone-specification expert Daniel Mercer is an illustrative persona, not a verified source. His guiding line is: “Choose the slab, not just the stone name.” It captures a practical point: Sesame Grey Granite can vary in shade, grain, and movement between batches. Check the actual slab, ask how it was finished, and confirm that the supplied material matches the approved sample. A polished surface may reflect more light; a honed finish can feel softer and show marks differently. Details matter.

This guide outlines how to compare appearance, finishes, performance, and supplier information before choosing. It also considers where the granite may suit kitchens, floors, facades, or other applications, subject to project conditions and professional advice. Ask about sealing, care, thickness, edge details, and installation requirements. Do not assume every slab behaves identically. That is easy to overlook. A careful choice begins with seeing the stone clearly, then matching its qualities to the demands of the project.
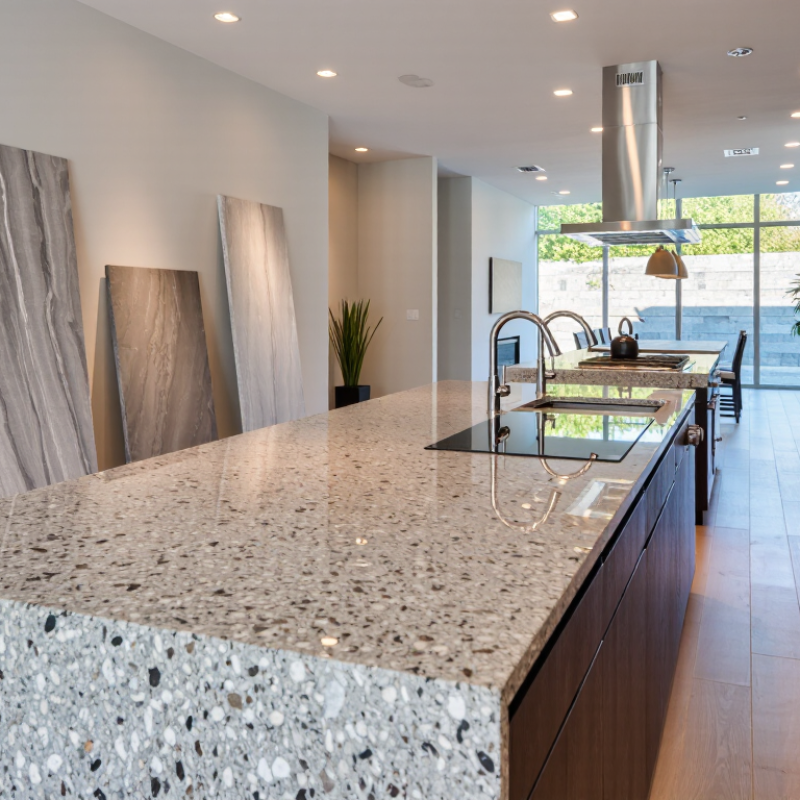
How to Choose Sesame Grey Granite for Your Project

Understanding Sesame Grey Granite and Its Key Characteristics

Sesame grey granite is recognized by its cool grey background and scattered darker mineral grains. Depending on the slab, you may also see small white or charcoal flecks. The pattern is usually granular rather than strongly veined, giving large surfaces a restrained, textured appearance. Still, the name does not guarantee a perfectly consistent look. Quarry source and block selection can change the balance of light and dark tones.

Inspect a full slab in person when possible. A small sample may hide clusters, streaks, or shifts in shade that become obvious across a kitchen island or floor. Check it under both daylight and indoor lighting; grey stone can look cooler or warmer as the light changes. The material is dense and commonly used for counters, paving, and other busy surfaces, but performance depends on fabrication, finish, and care. Ask whether the stone needs sealing, and follow the fabricator’s maintenance guidance. Polished surfaces show reflections clearly, while honed finishes soften glare but may reveal marks differently. Small differences matter. I would not choose by a color label alone; comparing the actual slab with nearby cabinets, flooring, and grout is a more reliable test.

Matching the Stone to Your Project’s Functional Needs

Sesame grey granite can serve counters, floors, stairs, or exterior cladding, but each use demands different performance. For a kitchen counter, check stain resistance, edge durability, and how the finish handles daily cleaning. A honed surface may soften glare, while a polished face shows reflections more clearly. Floors need a finish with suitable slip resistance, especially near sinks or entrances. For cladding, confirm the slab thickness, anchoring details, and project-specific structural requirements with a qualified fabricator or designer.

Use test data, not appearance alone. ASTM C615/C615M, the standard specification for granite dimension stone, sets a maximum water absorption of 0.40% and minimum compressive strength of 19,000 psi (131 MPa). These are specification thresholds, not a guarantee for every sesame grey slab. Ask for test results tied to the actual stone lot. The Natural Stone Institute’s Dimension Stone Design Manual also emphasizes matching stone properties and detailing to the application. Check the sample under the project’s lighting, too. Small speckles can look uniform indoors, then vary noticeably across a sunlit floor.

A color board can mislead. I would compare several full-size pieces, inspect veins and pits, and discuss sealing with the installer. Sesame grey is not perfectly consistent; that variation can be part of its character, or a frustrating surprise. Test the slab.

Comparing Color, Grain, Finish, and Available Grades

Sesame grey granite can range from cool silver-grey to warmer charcoal, with small beige or black flecks. View full slabs, not just a sample. A small tile may hide broader shifts in tone. Check it beside your cabinet, paving, or wall under both daylight and warm indoor lighting. The difference can be surprising.

Grain varies from fine, even speckling to visible mineral clusters and veins. Fine grain often gives a calmer look across large counters, while bolder patterns draw attention. Look closely. Ask to inspect several slabs from the same lot, since natural stone is not perfectly uniform. Photograph them from a few feet away; close-up images can exaggerate texture.

Finish changes both appearance and upkeep. Polished stone usually looks darker and reflects more light, while honed surfaces appear softer and less glossy. Flamed or brushed finishes add texture, which may suit outdoor areas, but can hold dirt more readily. Grade labels are not universal, so request the supplier’s written criteria for color consistency, fissures, thickness, and repairs. Compare those details with the intended use, not just the grade name. A grade description can still feel vague; clarify what variation is acceptable before ordering.

How to Choose Sesame Grey Granite for Your Project — Comparing Color, Grain, Finish, and Available Grades

Sesame grey granite varies naturally in tone and grain. Compare samples in the project’s actual lighting, and check that the grain and color variation suit the intended space. Polished, honed, and flamed finishes change the surface appearance and texture.

Mineral context: This chart shows Mohs hardness values for common granite-forming minerals—not a rating of a particular slab. Mica values are plotted at the midpoint of their typical ranges. Mohs hardness is an ordinal scale, not a measure of countertop durability or scratch resistance in use. Granite “grades” are not universally standardized, so ask the supplier how its grade labels are defined and inspect the specific slab.

Inspecting Slabs and Confirming Fabrication Requirements

Sesame grey granite can look calm from a distance, but its close-up pattern may vary across a slab. Inspect the actual slabs in person, rather than relying only on a small sample. Look for changes in grey tone, mineral flecks, veins, and any resin-filled areas. View the stone under bright, neutral light. If possible, check it both dry and slightly damp, since moisture can deepen the color. Slabs from the same lot may still differ. That detail is easy to underestimate.

Before approving a slab, ask the fabricator to mark the planned countertop pieces on its surface. Check how visible markings will fall near sinks, corners, and seams. Confirm slab thickness, finish, edge profile, cutout dimensions, and overhang support in writing. Share sink and appliance specifications early; even a small measurement change can affect a cutout. Verify who will take final measurements and when fabrication begins. One thing worth reconsidering: a dramatic vein may look striking alone, yet feel busy across a long counter.

Tips: Photograph each approved slab with its number visible, and keep the images with your project notes. Ask where seams are expected and whether pattern matching is practical. Recheck measurements after cabinets are installed. It is not glamorous, but it can prevent an expensive mismatch.

How to Choose Sesame Grey Granite for Your Project - Inspecting Slabs and Confirming Fabrication Requirements

Category What to Check or Confirm Inspection or Planning Method Project Requirement / Record
Color and pattern Compare the grey background, mineral speckles, and overall visual variation across the selected slabs. View the actual slabs in consistent lighting and from a normal viewing distance; do not rely only on a small sample. Approve the specific slabs or a representative range, and identify which pieces will be used together.
Veins and natural features Look for veins, mineral concentrations, fissures, pits, or filled areas that may affect appearance or cut placement. Inspect both the face and edges under good light; mark notable features on a slab photograph or layout drawing. Agree which natural features are acceptable and keep critical cutouts away from unsuitable areas where practical.
Surface condition Check for chips, scratches, cracks, resin-filled spots, and uneven or damaged areas. Examine the slab face and perimeter before fabrication; document any pre-existing damage. Record agreed repairs or exclusions before cutting begins.
Slab dimensions and thickness Confirm usable length, width, thickness, and any variation that could affect the layout. Measure the actual slabs. Common nominal granite thicknesses include 20 mm and 30 mm, but availability and finished dimensions vary. Specify the required finished thickness and confirm whether edges will be laminated or built up.
Finish and reflectivity Confirm the surface finish, such as polished or honed, and check that the appearance is consistent with the design. Review a finished sample or a representative finished area under the lighting expected in the space. State the finish for each visible surface and whether exposed edges should match.
Layout and slab yield Check that countertops, panels, or other pieces fit within usable slab areas while avoiding unsuitable features where possible. Review a scaled cutting layout against the measured slab dimensions before approving fabrication. Approve piece orientation, visible pattern placement, seams, and any material allowance for breakage or selection.
Seams and color matching Consider seam locations, joint width, and the visual transition between adjoining pieces. Review the proposed seam plan and, where possible, compare the actual pieces together before installation. Confirm seam positions and acknowledge that natural stone pieces may show color and pattern variation.
Cutouts and dimensions Verify sink, cooktop, faucet, outlet, and other cutout sizes and locations against the selected fixtures. Use current manufacturer templates or verified fixture dimensions, plus final site measurements where needed. Approve a dimensioned shop drawing before cutting; confirm the required cutout and edge treatment for each fixture.
Edge profile and exposed sides Choose the edge profile and identify all exposed edges, corners, backsplashes, and returns. Review an edge sample or profile drawing and confirm finished edge dimensions. List the profile for each edge and specify any eased corners or additional edge build-up.
Support and overhangs Confirm cabinet support, seams, cutouts, and any unsupported overhangs with the fabricator or project professional. Assess the actual stone thickness, span, loading, and support conditions; requirements depend on the installation design. Document any required brackets, sub-top, or reinforcement before installation.
Sealing and care Ask whether a sealer is recommended for the specific stone and finish, and how to maintain the surface. Follow the stone-care product instructions and test any sealer on a discreet area first. Record the recommended cleaning products and any resealing guidance provided for the installed stone.
Final approval and handling Ensure slab selection, approved drawings, cutout details, and delivery access are settled before production and transport. Keep dated slab photos and approved drawings; confirm access, lifting, and protection arrangements for delivery. Obtain written approval of the slab selection and fabrication details before cutting.

Note: Sesame Grey Granite is natural stone, so color, mineral pattern, and individual features can vary between slabs. Confirm dimensions, tolerances, support details, and fabrication instructions with the project fabricator before production.

Planning Installation, Sealing, and Long-Term Care

Before installation, inspect the actual Sesame Grey Granite slabs, not only a small sample. Grey tones and darker mineral flecks can shift noticeably across a full surface. Lay out the pieces in the room’s lighting and agree on vein direction and seam placement with your installer. Check that cabinets are level and supported before the stone arrives. Small details matter. One thing people sometimes rush is edge and cutout planning; moving a sink opening later is rarely simple.

Sealing depends on the stone’s porosity and its finish, so avoid following a fixed calendar without checking. Ask your stone supplier or installer which sealer suits the slab. On a clean, dry surface, a small water-drop test can help show whether the stone absorbs moisture, though it is not a substitute for professional guidance. Apply sealer only as directed, and remove excess before it dries. No guesswork.

For daily care, wipe spills promptly with a soft cloth and use a pH-neutral cleaner made for natural stone. Avoid harsh, acidic products; mineral-rich areas and protective treatments may respond differently. Use cutting boards and coasters, even though granite is durable. Inspect seams and high-use areas occasionally. If water begins darkening the surface quickly, ask a stone professional whether resealing is appropriate. Care needs can vary, and that is worth remembering.

We are proud to support

Registered Company Name: Upminster Containers Limited. Registered Address: Mardyke Works, St Mary's Lane, Upminster, Essex RM14 3PA. Registered Company Number: 00940382
Developed & Maintained By Space Rocket Digital.
chevron-down